I'm moving over to a NEW BLOG!
Blogger isn't cooperating at the moment so I can't export all my old entries to Word Press. All entries will stay here for the time being. Hopefully I'll get it all worked out soon.
Wednesday, May 14, 2008

Tuesday, May 13, 2008

Tuesdays with Dorie - Florida Pie

I start getting excited every Sunday night, not because the husband goes back to work the next day and I get the house ALL TO MYSELF, but because I know it's almost time for the Tuesdays with Dorie recipe to be posted. The week was extra exciting because the chosen recipe was Florida Pie!
I lived in Florida for quite a few years but I'd never heard of Florida Pie. Weird right? It turns out that it's basically a key lime pie with a layer of coconut cream and some more coconut folded into the meringue. And let me tell you, I love me some key lime pie.

The recipe was chosen by Dianne of Dianne's Dishes and I think this might be my favorite yet. Yeah, I know I've said that at least twice before but this one is seriously the best.

The only bad part about this recipe was all the limes I had to squeeze. I swear I went through 30 of them before I had enough juice. I even tried to recruit the husband but he managed to tune out all my yelling.
I had initially planned on doing whipped cream instead of a meringue because I'm still a little burnt out from the lemon meringue pie I made in January, but I gave the husband a choice between the two and he chose meringue.

The recipe was very simple although I had one screw up. Dorie calls for 1 1/2 cups of coconut DIVIDED and well, we know how this ends. I put all of it into the cream. It turned out fine though. I'm just lucky that my family loves coconut.
Dorie mentions in her recipe that she usually uses a store-bought graham cracker crust and since it's good enough for her, I decided it was good enough for me. I used the tiny ones and ended up with 11 little pies. Luckily my mom's birthday was this weekend so I passed some on to her and my dad.

Thank you to Dianne for choosing a great recipe!
Florida Pie
from: Baking: From My Home to Yours
1 9-inch graham cracker crust (page 235), fully baked and cooled, or a store-bought crust
1 1/3 cups heavy cream
1 1/2 cups shredded sweetened coconut
4 large eggs, seperated
1 14-ounce can sweetened condensed milk
1/2 cup fresh Key (or regular) lime juice (from about 5 regular limes)
1/4 cup of sugar
Getting Ready:
Center a rack in the oven and preheat the oven to 350 degrees F. Put the pie plate on a baking sheet lined with parchment of a silicone mat.
Put the cream and 1 cup of the coconut in a small saucepan and bring it to a boil over medium-low heat, stirring almost constantly. Continue to cook and stir until the cream is reduced by half and the mixture is slightly thickened. Scrape the coconut cream into a bowl and set it aside while you prepare the lime filling.
Working with a stand mixer, preferably fitted with a paddle attachment, or with a hand mixer in a large bowl beat the egg yolks at high speed until thick and pale. Reduce the mixer speed to low and beat in the condensed milk. Still on low, add half of the lime juice. When it is incorporated, add the reaming juice, again mixing until it is blended. Spread the coconut cream in the bottom of the graham cracker crust, and pour over the lime filling.
Bake the pie for 12 minutes. Transfer the pie to a cooling rack and cool for 15 minutes, then freeze the pie for at least 1 hour.
To Finish the Pie with Meringue:
Put the 4 egg whites and the sugar in a medium heavy-bottomed saucepan and heat over medium-low heat, whisking all the while, until the whites are hot to the touch. Transfer the whites to a stand mixer, fitted with the whisk attachment, or use a hand mixer in a large bowl, and beat the whites at high speed until they reach room temperature and hold firm peaks. Using a rubber spatula, fold the remaining 1/2 cup coconut into the meringue.
Spread the meringue over the top of the pie, and run the pie under the broiler until the top of the meringue is golden brown. (Or, if you've got a blowtorch, you can use it to brown the meringue.) Return the pie to the freezer for another 30 minutes or for up to 3 hours before serving.
Monday, May 12, 2008
Florentine Mac & Cheese with Turkey Sausage Meatballs
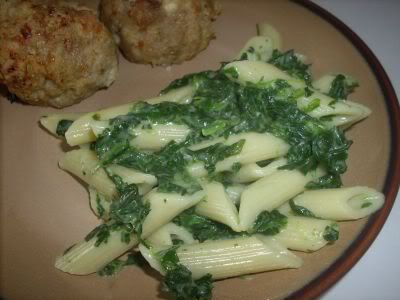
This recipe seems to be going around the blogworld lately and everyone's been raving about it. But it's a Rachael recipe.
I decided to give it a chance anyway because it seemed pretty basic. Just macaroni and cheese made with parmesan and spinach, with some meatballs. (She used ground chicken, I went turkey.)
We LOVED it. Landon gobbled up an entire bowl which shocked me like you wouldn't believe. My kid ate spinach! woo. Even Spencer liked it although he did tell me to cut back on the spinach next time.
Just as a warning: it made a ton of food. I filled up two containers of leftover pasta and another container of meatballs. She had to have made her meatballs huge to get only 8 of them!
Florentine Mac and Cheese with Chicken Sausage Meatballs
from Food Network
Salt
1 pound cavatappi corkscrew shaped hallow pasta
1 1/2 pounds ground chicken
Black pepper
2 to 3 sprigs fresh rosemary, leaves stripped and finely chopped
2 teaspoons fennel seeds
3 cloves garlic, grated
1 teaspoon crushed red pepper flakes
1 cup ricotta cheese
1 1/2 cups grated Parmigiano Reggiano, divided
1 egg
3/4 cup bread crumbs, plus more, if needed
3 tablespoons extra-virgin olive oil, divided
2 boxes, 10 ounces, chopped frozen spinach
3 tablespoons butter
2 tablespoons all-purpose flour
1 cup chicken stock
1 cup whole milk
1/8 teaspoon grated nutmeg
Preheat oven to 450 degrees F.
Place a large pot of water on to boil for pasta. When it comes to a boil, salt it and add the pasta to cook to al dente. Strain pasta reserving 1 cup cooking liquid.
While the water is coming to a boil, in a large mixing bowl combine the chicken, salt and pepper, rosemary, fennel seeds, garlic, crushed red pepper flakes, ricotta cheese, 1/2 cup grated Parmigiano - a rounded handful, egg and bread crumbs. *If the mixture seems too wet, add a handful of bread crumbs and mix together.
Form 8 large round balls, about 3 to 4-inches. Coat balls in a couple of tablespoons of extra-virgin olive oil and lightly grease a baking sheet with 1 tablespoon extra-virgin olive oil. Arrange balls on the baking sheet and roast 17 to 18 minutes until juices run clear.
Defrost spinach in microwave 8 to 10 minutes on "defrost" setting depending on the microwave. Place the boxes in a shallow dish to catch any run off.
While the meatballs roast, in a medium sauce pot over medium heat, melt butter, whisk in flour, cook 1 minute then whisk in stock and milk, season with salt, pepper and nutmeg and thicken 5 to 6 minutes. Stir in the remaining 1 cup grated Parmigiano and reduce heat on lowest setting.
Wring spinach completely dry in clean kitchen towel then separate as you add it to the sauce. Also add the reserved 1 cup pasta cooking liquid.
Toss pasta with the spinach-white sauce and adjust seasonings.
Polenta Sausage Mozzarella Casserole.

Lately I've been kind of obsessed with polenta. I keep planning meals with polenta but then I get scared that Spencer will hate it so I forget that idea and order pizza. When I saw this recipe for polenta lasagna on Simply Recipes I promised myself that I'd actually make it. I mean, it has sausage and we love sausage.
This was my first time using my broiler. Scary scary. I had no idea how to even turn it on but I eventually figured it out and all was well. I've even used the broiler a couple times since then so I'd say I successfully conquered my fear.
Once Spencer got over the idea of eating "grits with spaghetti sauce" he liked it. Not enough to eat leftovers, but he didn't complain. Landon and I both enjoyed it and finished off the whole pan within a couple days.
I won't make it again since Spencer wasn't a huge fan but if I was going to, I'd cut back on the polenta. I made my own with 1 1/2 cups of cornmeal and about 6 cups of chicken broth and it was way too much. I think a cup of cornmeal would be a good amount.
Polenta Sausage Mozzarella Casserole
5 1/2 Tbsp olive oil
1 can (28 ounces) crushed tomatoes
1 Tbsp chopped fresh oregano
1 med yellow onion, halved lengthwise then cut into wedges
1 medium bell pepper (red, green, orange or yellow), cut lengthwise into thin slices
2 cloves garlic, minced
1/2 teaspoon salt
1/2 teaspoon freshly ground black pepper
1/2 teaspoon red chili flakes
1 pound Italian sausage (removed from casings), sweet or spicy
2 pounds of prepared polenta, 1/2-inch slices if using prepared polenta in a tube
1/2 pound (8 ounces) fresh mozzarella, 1/4-inch slices
Preheat oven broiler on high. Heat 3 Tbsp of oil in a 2-3 qt saucepan on medium heat. Add tomatoes and oregano, simmer, uncovered for 15 minutes.
While the tomatoes are cooking, in a large frying pan, heat 1 Tbsp oil over medium-high heat. Add the onion, bell pepper, garlic, salt, pepper, and chili flakes. Cover the pan, lower the heat to medium, and cook until the vegetables have softened, about 5 minutes. Add the sausage, stirring and breaking it into small pieces as it cooks, about 5 minutes. Cover the pan and cook until vegetables are tender and the sausage is cooked through, about 5-8 more minutes. Add the tomato sauce and simmer for 10 minutes.
While the sauce is cooking, coat the bottom of a 9x13-inch baking pan with a 1 Tbsp oil. Add the cooked polenta (or slices) to the pan. Coat the top of the polenta with the remaining 1/2 Tbsp oil. Broil the polenta about 4 inches from the heating element until golden brown and crispy, about 10-15 minutes.
Pour sauce over broiled polenta, then arrange Mozzarella slices over the top and return the casserole to the broiler. Broil until the cheese is melted and beginning to brown, about 2 minutes. Let cool for a few minutes before serving.
Wednesday, May 7, 2008
Man food.

In my almost 2 years of marriage I've learned that sometimes I have to cook things that aren't pretty or that I don't think I'll like in order to keep the man happy.
The husband has a strange love of nachos. He gets nachos when we go to movies, he makes special trips to Applebees just for their big basket of nachos (and I sip my strawberry mojito while he eats all of them), and he'll even make his own rotel dip.
This past weekend we went to Chili's because I'm kind of in love with their honey-chipotle chicken crispers and he, of course, ordered their nacho appetizer. Well it came with 8 or 9 "nachos" and it was basically just tortilla chips with melted cheese on top. Needless to say, he was disappointed.
I went on a search for good nachos for him and found a recipe on Tammy's Recipes. It turned out great. I was shocked at how simple and good it was. I will say though that I had to add quite a bit more cumin and chili powder, along with some cayenne. But the end result was much better than I expected and the husband was very excited to come home to nachos.
(I apologize for the picture. Like I said, it's not a pretty dish.)
Morrocan-Style Chicken Phyllo Rolls with Spiced Tomato Sauce

I saw this recipe over on Love and Olive Oil a couple months ago, put it in my bookmarks, and then completely forgot about it. Then last week I was in a big funk and couldn't come up with anything to cook. I stared into my freezer for what seemed like hours and then spotted some phyllo. Ding ding ding! I had everything on hand for this recipe except turmeric (which ended up costing me almost $8! Ridiculous.) so onto the meal plan it went.
The recipe seemed pretty simple to me. I mean, it's just chicken with a bunch of spiced rolled in phyllo. Easy enough, right? Wrong. It took me HOURS. And then I made the mistake of tasting the chicken mixture before I rolled it up and almost cried. It was not good at all. I kept going with it though because I had to have something ready for the husband when he walked through the door.
So Spencer walked in and I immediately warned him that dinner was going to suck and he might as well turn around and hit McDonald's. But he tried a phyllo roll. And then another. And then 8 more. Let me tell you, these things are addictive. They were delicious! The two of us went through almost all of them over the course of the night. The spiced tomato sauce that was served with them was good too but I think the rolls are best alone.
Moroccan-Style Chicken Phyllo Rolls
1 small onion, finely chopped
1 tablespoon olive oil
Scant teaspoon salt
3/4 teaspoon ground cumin
1/2 teaspoon ground ginger
1/2 teaspoon turmeric
1/2 teaspoon black pepper
1/4 teaspoon ground coriander
1 1/4 lb chicken thighs (with skin and bones)
3/4 cup low-sodium chicken broth
1/2 cup water
1 (3-inch) cinnamon stick
1/4 cup sliced almonds, toasted, cooled, and coarsely chopped
2 large eggs, lightly beaten
1 stick (1/2 cup) unsalted butter, melted
8 (17- by 12-inch) phyllo sheets, thawed if frozen
1 teaspoon ground cinnamon
2 teaspoons brown mustard seeds
Make filling:
Cook onion in oil along with salt, cumin, ginger, turmeric, pepper, and coriander in a 3-quart heavy saucepan over moderate heat, stirring, until softened, about 5 minutes. Add chicken, broth, water, and cinnamon stick and simmer, covered, turning chicken over once, until meat is very tender, about 45 minutes total. Transfer chicken with tongs to a bowl, reserving cooking liquid.
When cool enough to handle, shred chicken, discarding skin and bones, and transfer to a large bowl. Transfer cooking liquid to a 2-cup glass measure (do not clean saucepan) and let stand 1 minute, then skim off fat and discard cinnamon stick. Return liquid to saucepan and simmer over moderately high heat, uncovered, until reduced to about 1/4 cup (liquid will look like a glaze in bottom of pan), about 8 minutes, then stir into shredded chicken along with almonds.
Reserve 2 tablespoons beaten egg in a cup for egg wash. Lightly season remaining egg with salt and pepper, then cook in 1/2 tablespoon butter in an 8- to 10-inch nonstick skillet over moderately high heat, stirring, until just set but still slightly soft. Stir scrambled egg into filling.
Make rolls:
Put oven racks in upper and lower thirds of oven and preheat oven to 450°F.
Put 1 phyllo sheet on a work surface, keeping remaining phyllo covered with overlapping sheets of plastic wrap and a damp kitchen towel, and brush generously with some melted butter. Evenly sift 1/4 teaspoon cinnamon over buttered phyllo using a fine-mesh sieve, then top with another phyllo sheet and generously brush with butter.
Halve buttered phyllo stack crosswise, then arrange 1 half with a long side nearest you. Spread 1/4 cup chicken filling in a narrow strip along edge nearest you, then roll up filling tightly in phyllo, leaving ends open. Transfer roll, seam side down, to a cutting board set inside a baking pan (to help contain mustard seeds when sprinkling). Make another roll with remaining half stack. Make 6 more rolls in same manner, transferring to cutting board.
Lightly brush top of rolls with egg wash and immediately sprinkle with mustard seeds, pressing lightly on seeds to help adhere. Cut each roll crosswise into 4 pieces and arrange pieces 1 inch apart on 2 baking sheets. Bake, switching position of sheets halfway through baking, until phyllo is golden brown, about 12 minutes total.
Transfer rolls to a rack to cool slightly.
Cooks' notes:
• Rolls can be assembled (but not coated or cut) 1 day ahead and chilled, covered.
• Rolls can be assembled and cut (but not coated or baked) 2 weeks ahead and frozen, wrapped well in plastic wrap. Coat frozen rolls, then bake (do not thaw) in a preheated 350°F oven about 20 minutes.
Spiced Tomato Sauce
1/3 cup finely chopped onion
1 garlic clove, finely chopped
1 1/2 teaspoons finely chopped peeled fresh ginger
3/4 teaspoon ground cumin
1/2 teaspoon hot paprika
1/4 teaspoon ground cinnamon
Pinch of cayenne
Pinch of ground cloves
1 tablespoon olive oil
1 1/2 tablespoons cider vinegar
1 (14 1/2- to 15-oz) can whole tomatoes in juice, coarsely chopped (reserving juice)
2 tablespoons light brown sugar
Cook onion, garlic, ginger, and spices in oil in a 1- to 2-quart heavy saucepan over moderately low heat, stirring, until onion is softened, about 4 minutes. Stir in vinegar and simmer over moderately low heat 1 minute. Add tomatoes (with juice) and brown sugar, then increase heat to moderate and simmer, stirring occasionally, until slightly thickened, about 30 minutes. Cool slightly, about 5 minutes.
Purée sauce in a blender until smooth (use caution when blending hot liquids). Serve at room temperature.
Cooks' note:
Sauce can be made 3 days ahead and cooled completely, then chilled, covered.
Amano Chocolates!

Tuesday, May 6, 2008
Tuesdays with Dorie - Peanut Butter Torte
This week Elizabeth of Ugg Smell Food chose Peanut Butter Torte as our Tuesdays with Dorie recipe.
Unfortunately it just wasn't my week. I was overwhelmed and the recipe just seemed like too much to add to my list. I really want to try this recipe eventually so you might see it on here one day.
In the meantime, head over to the blogroll and check out all the lovely tortes.
(PS. Is "tortes" the correct way to say that?)
Wednesday, April 30, 2008
Pineapple Coconut Mini Muffins

Last week I was standing in Target trying to decide which kitchen gadget to buy next when I remembered that Joelen's Tasty Tools event this month is about scoops. I used that as an excuse to buy my very first shiny scoop.
Next step was finding a recipe. I initially wanted to do cookies, but couldn't find a recipe that didn't involve me running to the store. So muffins it was.

My baking cabinet is looking pretty thin these days. I had an assortment of dried fruit, a bag of m&ms, and some coconut. Dried pineapple and coconut sounded like a good match so I (gasp) decided to try to come up with my own recipe.
They turned out pretty good. Everytime I use dried pineapple I'm reminded that I really don't like it. But the kid does so he's been eating these for breakfast every morning.

Pineapple Coconut Muffins
1/2 cup all-purpose flour
1/2 cup whole wheat flour
1/2 teaspoon baking soda
1/4 teaspoon salt
1/2 cup sugar
2 tablespoons butter, softened
1/2 cup applesauce
1 egg
2 tablespoons sour cream
1/2 teaspoon vanilla
3/4 cup shredded coconut
1/2 cup dried pineapple, chopped
Preheat oven to 350. Spray (and line if you'd like) a muffin pan.
Whisk together flours, baking soda, and salt. Set aside.
Beat butter and sugar until well blended. Add applesauce, egg, sour cream, and vanilla. Beat well. Add flour mixture and beat until just blended. Stir in coconut and pineapple.
Use scoop to put equal amounts of batter into each cup. Bake in preheated oven for about 25 minutes or until a toothpick inserted in the center comes out clean. Cool completely on a wire rack.
Make sure you check out the Tasty Tools event and get your entry in by May 2!
Monday, April 28, 2008
Tuesdays with Dorie - Fluted Polenta and Ricotta Cake

I have a confession. I was almost a bad baker this week.
Caitlin of Engineer Baker chose Dorie's Fluted Polenta and Ricotta Cake as this week's Tuesdays with Dorie recipe. I was thisclose to sitting out because I can't even look at ricotta anymore. Eating lasagna twice a week throughout a pregnancy will do that to someone. But I love figs so I decided to go ahead with it.
Well guess what. No one in Mobile, Alabama has figs. No one. So I settled on dried apricots, came home, read the comments on the TWD blog, and decided dates would be better. (Now, what to do with a bag of apricots?!)

I halved the recipe and used three small tart pans. All three of them overflowed. I didn't expect them to puff up nearly as much as they did.
It turned out pretty good, but nothing like I expected. I thought it tasted like really, really, really sweet cornbread. The dates kind of melted into it and you could hardly tell they were there. It's not something I'll make again, but neither of my boys had any complaints about it.

Now go see all the other Fluted Polenta and Ricotta Cakes at Tuesdays with Dorie and then visit Caitlin's blog for the recipe.
Saturday, April 26, 2008
Blueberry-Lemon Banana Bread.
We love bananas in my house. I bought a big bunch of 8 or 9 yesterday and we're down to 1 already! When I saw that Not Quite Nigella was hosting a banana bread event I knew I had to join in the fun.
I had trouble choosing a recipe. It seems that everyone in the world has a banana bread recipe that they swear by and I think I looked at hundreds of them trying to decide. I finally settled on a bran version but when I went to the store to pick up wheat bran, I changed my mind and went with blueberries.

The original recipe comes from Cooking Light and includes a glaze made from cream cheese. I ended up leaving that off when part of my bread decided to stick to the bottom of my pan. Grr. That's also why I don't have a picture of the full loaf.
Besides the whole sticking-to-the-pan issue, the bread turned out really good. The lemon isn't really noticeable but I think that's because the blueberries are so strong. I have a feeling that once Spencer tries this he'll be asking me to make it again.
Blueberry-Lemon Banana Bread
from: Cooking Light
2 cups all-purpose flour
3/4 teaspoon baking soda
1/2 teaspoon salt
1 cup granulated sugar
1/4 cup butter, softened
1 cup mashed ripe banana (about 2 bananas)
1/2 cup egg substitute
1/3 cup reduced-fat sour cream
1 teaspoon vanilla extract
1 cup fresh blueberries
1 tablespoon grated lemon rind
Cooking spray
Preheat oven to 350°.
To prepare the banana bread, lightly spoon flour into dry measuring cups, and level with a knife. Combine flour, baking soda, and salt, stirring with a whisk to combine.
Place granulated sugar and butter in a large bowl, and beat with a mixer at medium speed until mixture is well blended (about 1 minute). Add mashed banana, egg substitute, sour cream, and vanilla; beat until blended. Add flour mixture; beat at low speed just until moist. Gently fold in blueberries and lemon rind. Spoon batter into an 8 1/2 x 4 1/2-inch loaf pan coated with cooking spray. Bake at 350° for 1 hour and 15 minutes or until a wooden pick inserted in center comes out clean. Cool the bread 10 minutes in pan on a wire rack; remove the bread from pan. Cool completely on wire rack.
I had trouble choosing a recipe. It seems that everyone in the world has a banana bread recipe that they swear by and I think I looked at hundreds of them trying to decide. I finally settled on a bran version but when I went to the store to pick up wheat bran, I changed my mind and went with blueberries.

The original recipe comes from Cooking Light and includes a glaze made from cream cheese. I ended up leaving that off when part of my bread decided to stick to the bottom of my pan. Grr. That's also why I don't have a picture of the full loaf.
Besides the whole sticking-to-the-pan issue, the bread turned out really good. The lemon isn't really noticeable but I think that's because the blueberries are so strong. I have a feeling that once Spencer tries this he'll be asking me to make it again.
Blueberry-Lemon Banana Bread
from: Cooking Light
2 cups all-purpose flour
3/4 teaspoon baking soda
1/2 teaspoon salt
1 cup granulated sugar
1/4 cup butter, softened
1 cup mashed ripe banana (about 2 bananas)
1/2 cup egg substitute
1/3 cup reduced-fat sour cream
1 teaspoon vanilla extract
1 cup fresh blueberries
1 tablespoon grated lemon rind
Cooking spray
Preheat oven to 350°.
To prepare the banana bread, lightly spoon flour into dry measuring cups, and level with a knife. Combine flour, baking soda, and salt, stirring with a whisk to combine.
Place granulated sugar and butter in a large bowl, and beat with a mixer at medium speed until mixture is well blended (about 1 minute). Add mashed banana, egg substitute, sour cream, and vanilla; beat until blended. Add flour mixture; beat at low speed just until moist. Gently fold in blueberries and lemon rind. Spoon batter into an 8 1/2 x 4 1/2-inch loaf pan coated with cooking spray. Bake at 350° for 1 hour and 15 minutes or until a wooden pick inserted in center comes out clean. Cool the bread 10 minutes in pan on a wire rack; remove the bread from pan. Cool completely on wire rack.
Wednesday, April 23, 2008
Honey Wheat Crescent Rolls

I saw these crescent rolls over on Tracey's Culinary Adventures a few days ago and immediately bookmarked it. Spencer loves crescent rolls but I hate the idea of the canned rolls so I won't buy them for him. I wish I had known they were this simple to make!
The recipe says to use a food processor to bring the dough together but I used this as an opportunity to break in my BRAND NEW STAND MIXER! Woo! It came together within minutes and rose just as the recipe said it would. In my (very limited) bread making experience, this has been the simplest recipe I've used.
Now, my crescent rolls aren't pretty. Like I said I've never actually made any and actually had to be shown how to roll them by my mother-in-law at Christmas. But they were surprisingly delicious so I can overlook their ugliness.
Honey Wheat Crescent Rolls
from Weight Watchers New Complete Cookbook
1 cup warm (105-115 F) water
2 tablespoons honey
1 package active dry yeast
1 1/2 cups all-purpose flour
1 cup whole-wheat flour
1 1/2 teaspoons salt
In a 2-cup measuring cup, combine the water and honey; sprinkle in the yeast and let stand until foamy, about 5 minutes.
In a food processor, combine the all-purpose flour, whole-wheat flour and salt. With the machine running, pour the yeast mixture through the feed tube; pulse until the dough forms a ball, about 1 minute. Turn the dough out onto a lightly floured surface and knead a few times until smooth.
Spray a large bowl with nonstick spray and put the dough in the bowl. Cover lightly with plastic wrap and let the dough rise in a warm, draft-free place until doubled in volume, about 35 minutes.
Spray a baking sheet with nonstick spray. Punch down the dough. Sprinkle a work surface lightly with flour. Turn the dough onto the surface; cut in half. Roll each half into a 10-inch circle. Cut each circle into 6 wedges. Roll each wedge, from the wide side, and form into a crescent. Place, pointed-end down, on the baking sheet. Repeat with the remaining dough, arranging the rolls 1 inch apart. Cover lightly with plastic wrap and let rise in a warm, draft-free place until they double in size, about 35 minutes.
Preheat the oven to 375 F. Bake the rolls until they are golden brown and sound hollow when lightly tapped, about 15 minutes. Remove the rolls from the baking sheet and cool on a rack.
Makes 12 rolls.
Monday, April 21, 2008
Tuesdays with Dorie - Bill's Big Carrot Cake
It seems like since I joined Tuesdys with Dorie my luck hasn't been very good. My lemon cream tarts fell apart, the gooey chocolate cakes weren't gooey, and my marshmallows just weren't very pretty.
But if there's one thing I can do, it's cupcakes. I can't even begin to tell you how excited I was when Amanda of Slow Like Honey chose Bill's Big Carrot Cake as our recipe for the week. As soon as it was announced, I ran out for carrots and cupcake liners and got to work.

The husband likes to frequently remind me that carrot cake is his favorite cake so I end up making it for him every couple of months. I try a different recipe each time but I think I'm going to make this my go-to carrot cake. The recipe called for coconut and dried cranberries which isn't something I'd normally add to a carrot cake, but both ingredients were perfect.
The lemon cream cheese frosting was delicious! I'm a fan of just plain ol' vanilla frosting for carrot cake but the lemon went really well. I topped the cupcakes with toasted coconut and walnuts.

Bill's Big Carrot Cake
from: Baking: From My Home to Yours
For the cake:
2 cups all purpose flour
2 teaspoons baking powder
2 teaspoons baking soda
2 teaspoons ground cinnamon
¾ teaspoon salt
3 cups grated carrots (about 9 carrots, you can grate them in food processor fitted w/ a shredding a blade or use a box grater)
1 cup coarsely chopped walnuts or pecans
1 cup shredded coconut (sweetened or unsweetened)
½ cup moist, plump raisins (dark or golden) or dried cranberries
2 cups sugar
1 cup canola oil
4 large eggs
For the frosting:
8 ounces cream cheese, room temperature
1 stick ( 8 tablespoons) unsalted butter, at room temperature
1 pound or 3 and ¾ cups confectioners' sugar, sifted
1 tablespoon fresh lemon juice or ½ teaspoon pure lemon extract
½ cup shredded coconut (optional)
Finely chopped toasted nuts and/or toasted shredded coconut (optional)
Getting ready:
Position the racks to divide the oven into thirds and preheat the oven to 325 degrees Fahrenheit. Butter three 9-x-2-inch round cake pans, flour the insides, and tap out the excess. Put the two pans on one baking sheet and one on another.
To make the cake:
Whisk the flour, baking powder, baking soda, cinnamon and salt. In another bowl, stir together the carrots, chopped nuts, coconut, and raisins.
Working with a stand mixer, preferably fitted with a paddle attachment, or with a hand mixer in a large bowl, beat the sugar and oil together on a medium speed until smooth. Add the eggs one by one and continue to beat until the batter is even smoother. Reduce the speed to low and add the flour mixture, mixing only until the dry ingredients disappear. Gently mix the chunky ingredients. Divide the batter among the baking pans.
Bake for 40-50 minutes, rotating the pans from top to bottom and front to back at the midway point, until a thin knife inserted into the centers comes out clean. The cakes will have just started to come away from the sides of the pans. Transfer the cakes to cooling racks and cool for about 5 minutes, then run a knife around the sides of the cakes and unmold them. Invert and cool to room temperature right side up.
The cakes can be wrapped airtight and kept at room temperature overnight or frozen for up to 2 months.
To make the frosting:
Working with a stand mixer, preferably fitted with a paddle attachment or with a hand mixer in a large bowl, beat the cream cheese and butter together until smooth and creamy. Gradually add the sugar and continue to beat until the frosting is velvety smooth. Beat in the lemon juice or extract.
If you'd like coconut in the filling, scoop about half of the frosting and stir the coconut into this position.
To assemble the cake:
Put one layer top side up on a cardboard cake round or a cake plate protected by strips of wax or parchment paper. If you added the coconut to the frosting, use half of the coconut frosting to generously cover the first layer (or generously cover with plain frosting). Use an offset spatula or a spoon to smooth the frosting all the way to the edges of the layer. Top with the second layer, this time placing the cake stop side down, and frost with the remainder of the coconut frosting or plain frosting. Top with the last layer, right side up, and frost the top- and the sides- of the cake. Finish the top with swirls of frosting. If you want to top the cake with toasted nuts or coconut, sprinkle them on now while the frosting is soft.
Refrigerate the cake for 30 minutes, just to set the frosting before serving.
Serving:
This cake can be served as soon as the frosting is set. It can also wait, at room temperature and covered with a cake keeper overnight. The cake is best served in thick slices at room temperature and while it's good plain, it's even better with vanilla ice cream or some lemon curd.
Storing:
The cake will keep at room temperature for 2 to 3 days. It can also be frozen. Freeze it uncovered, then when it's firm, wrap airtight and freeze for up to 2 months. Defrost, still wrapped, overnight in the refrigerator.
Sunday, April 20, 2008
Yup.
I'm playing around with my blog right now. I can't seem to come up with a good name so it's been changing every few hours. I'm kind of attached to my web address so I'm going to keep it but I want a new title.
I also started a new blog over here to separate the food from the little boy.
I hope to have a good name for this blog within the next... umm, year.
I also started a new blog over here to separate the food from the little boy.
I hope to have a good name for this blog within the next... umm, year.
Wednesday, April 16, 2008
Fish Tacos.
I love TGIFridays fish tacos. Love them. But, you know, they don't really fit into my new healthy lifestye since they're covered in an amazing nacho crust and fried.
And well, I'll admit to another reason I won't be having their fish tacos anytime soon. My friend Johanna and I were (not so) politely asked not to return to TGIFridays. Sigh. To make a long story short, a hostess there dated my husband and Johanna's fiance forever ago and she refused to give us a high chair last time all of us went together. I should've let it go, been the bigger person. But I couldn't. So yeah...
Okay, last night I wanted fish tacos. Healthy fish tacos. And where did I turn? Everybody say it together. COOKING LIGHT!

It's basically just fish (they called for red snapper, but I used grouper) covered in spices, baked, and thrown into a tortilla with cabbage (err... lettuce in my case) and a cilantro-lime crema. But it was so good! My only complaint is that the lime in the crema was a little too strong for me. Other than that, perfection.
Fish Tacos with Lime-Cilantro Crema
from Cooking Light
Crema:
1/4 cup thinly sliced green onions
1/4 cup chopped fresh cilantro
3 tablespoons fat-free mayonnaise
3 tablespoons reduced-fat sour cream
1 teaspoon grated lime rind
1 1/2 teaspoons fresh lime juice
1/4 teaspoon salt
1 garlic clove, minced
Tacos:
1 teaspoon ground cumin
1 teaspoon ground coriander
1/2 teaspoon smoked paprika
1/4 teaspoon ground red pepper
1/8 teaspoon salt
1/8 teaspoon garlic powder
1 1/2 pounds red snapper fillets
Cooking spray
8 (6-inch) corn tortillas
2 cups shredded cabbage
Preheat oven to 425°.
To prepare crema, combine the first 8 ingredients in a small bowl; set aside.
To prepare tacos, combine cumin and next 5 ingredients (through garlic powder) in a small bowl; sprinkle spice mixture evenly over both sides of fish. Place fish on a baking sheet coated with cooking spray. Bake at 425° for 9 minutes or until fish flakes easily when tested with a fork or until desired degree of doneness. Place fish in a bowl; break into pieces with a fork. Heat tortillas according to package directions. Divide fish evenly among tortillas; top each with 1/4 cup cabbage and 1 tablespoon crema.
And well, I'll admit to another reason I won't be having their fish tacos anytime soon. My friend Johanna and I were (not so) politely asked not to return to TGIFridays. Sigh. To make a long story short, a hostess there dated my husband and Johanna's fiance forever ago and she refused to give us a high chair last time all of us went together. I should've let it go, been the bigger person. But I couldn't. So yeah...
Okay, last night I wanted fish tacos. Healthy fish tacos. And where did I turn? Everybody say it together. COOKING LIGHT!
It's basically just fish (they called for red snapper, but I used grouper) covered in spices, baked, and thrown into a tortilla with cabbage (err... lettuce in my case) and a cilantro-lime crema. But it was so good! My only complaint is that the lime in the crema was a little too strong for me. Other than that, perfection.
Fish Tacos with Lime-Cilantro Crema
from Cooking Light
Crema:
1/4 cup thinly sliced green onions
1/4 cup chopped fresh cilantro
3 tablespoons fat-free mayonnaise
3 tablespoons reduced-fat sour cream
1 teaspoon grated lime rind
1 1/2 teaspoons fresh lime juice
1/4 teaspoon salt
1 garlic clove, minced
Tacos:
1 teaspoon ground cumin
1 teaspoon ground coriander
1/2 teaspoon smoked paprika
1/4 teaspoon ground red pepper
1/8 teaspoon salt
1/8 teaspoon garlic powder
1 1/2 pounds red snapper fillets
Cooking spray
8 (6-inch) corn tortillas
2 cups shredded cabbage
Preheat oven to 425°.
To prepare crema, combine the first 8 ingredients in a small bowl; set aside.
To prepare tacos, combine cumin and next 5 ingredients (through garlic powder) in a small bowl; sprinkle spice mixture evenly over both sides of fish. Place fish on a baking sheet coated with cooking spray. Bake at 425° for 9 minutes or until fish flakes easily when tested with a fork or until desired degree of doneness. Place fish in a bowl; break into pieces with a fork. Heat tortillas according to package directions. Divide fish evenly among tortillas; top each with 1/4 cup cabbage and 1 tablespoon crema.
Tuesday, April 15, 2008
Apple-Cranberry Turnovers
Since I'm working through all my food issues right now I decided to treat myself to Ellie Krieger's book. I'm actually not a fan of Ellie's show on Food Network and I can't think about her without feeling a little ill about the time she made a chocolate sauce for her beef tenderloin, but the book was recommended to me by more than one person.
I figured the best thing to do was start off with something sweet. I mean, that's hard to screw up. I settled on her apple-cranberry turnovers. Not too long ago I fell in love with Dorie Greenspan's apple turnovers so a lower calorie substitution would be nice for me to have.

These turnovers aren't too different from Dorie's except that they are made with phyllo instead of a yummy, buttery pastry crust. I like phyllo, but not for turnovers. Luckily I was smart and halved the recipe. Even with halving it, though, I ended up with way too much filling. Landon's been slowly getting rid of it for me.
My other issue is that the recipe calls for crushed ladyfingers. In my mind ladyfingers are soft cookies, but since it specifies crushed I assume she means a crunchy cookie. I couldn't locate crunchy ladyfingers and even thought about maybe using shortbread but ended up going with the soft ones. I couldn't really taste them but it was kind of strange looking if you cut into them.
I think if you're one of those people who eat fruit turnovers for the filling, you'd enjoy these. But if you're like me and only eat them for the crust, stay far away from this recipe.
Apple-Cranberry Turnovers
from The Food You Crave
4 Granny Smith apples (about 1 1/2 pounds), peeled, cored, and cut into 1/4 inch thick slices
1/3 cup unsweetened dried cranberries
1/3 cup firmly packed brown sugar
1/2 teaspoon ground cinnamon
pinch of ground nutmeg
1 teaspoon cornstarch dissolved in 1 tablespoon cold water
6 sheets frozen phyllo dough, thawed
3 tablespoons canola oil
4 ladyfinger cookies, crushed
cooking spray
Preheat oven to 350.
In a large nonstick skillet, combine the apples, cranberries, brown sugar, cinnamon, and nutmeg and cook over medium heat, stirring occasionally, until the fruit is tender, about 10 minutes. Stir in the cornstarch slurry and cook until the juices in the skillet thicken, another 2 to 3 minutes. Set aside to cool.
Lay a sheet of phyllo on a large cutting board and brush with the oil. Top with a second sheet and brush with the oil. Sprinkle half of the crushed cookies on top. Add another sheet of phyllo and brush with the oil. Cut the layered phyllo into 4 long strips. Put a small mound of the apple mixture about an inch from the bottom of one strip and fold the phyllo over the mixture into a triangle-shaped pocket. Continue to fold the strip up in the way to maintain the triangle shape so a turnover is formed. Repeat with the other three strips. Repeat the whole process again with the remaining three sheets of phyllo so that you wind up with 8 turnovers. Be sure to reserve a little oil to brush the top of each turnover.
Coat a baking sheet with cooking spray, place the turnovers on the sheet, brush the tops with the remaining oil, and bake until nicely browned, 20 to 25 minutes. Serve warm.
Serving Size: 1 Turnover
Calories: 200
Total Fat: 6.5 G
Protein: 2 G
Carb: 35 G
Fiber: 2 G
Chol.: 20 MG
Sodium: 82 MG
I figured the best thing to do was start off with something sweet. I mean, that's hard to screw up. I settled on her apple-cranberry turnovers. Not too long ago I fell in love with Dorie Greenspan's apple turnovers so a lower calorie substitution would be nice for me to have.
These turnovers aren't too different from Dorie's except that they are made with phyllo instead of a yummy, buttery pastry crust. I like phyllo, but not for turnovers. Luckily I was smart and halved the recipe. Even with halving it, though, I ended up with way too much filling. Landon's been slowly getting rid of it for me.
My other issue is that the recipe calls for crushed ladyfingers. In my mind ladyfingers are soft cookies, but since it specifies crushed I assume she means a crunchy cookie. I couldn't locate crunchy ladyfingers and even thought about maybe using shortbread but ended up going with the soft ones. I couldn't really taste them but it was kind of strange looking if you cut into them.
I think if you're one of those people who eat fruit turnovers for the filling, you'd enjoy these. But if you're like me and only eat them for the crust, stay far away from this recipe.
Apple-Cranberry Turnovers
from The Food You Crave
4 Granny Smith apples (about 1 1/2 pounds), peeled, cored, and cut into 1/4 inch thick slices
1/3 cup unsweetened dried cranberries
1/3 cup firmly packed brown sugar
1/2 teaspoon ground cinnamon
pinch of ground nutmeg
1 teaspoon cornstarch dissolved in 1 tablespoon cold water
6 sheets frozen phyllo dough, thawed
3 tablespoons canola oil
4 ladyfinger cookies, crushed
cooking spray
Preheat oven to 350.
In a large nonstick skillet, combine the apples, cranberries, brown sugar, cinnamon, and nutmeg and cook over medium heat, stirring occasionally, until the fruit is tender, about 10 minutes. Stir in the cornstarch slurry and cook until the juices in the skillet thicken, another 2 to 3 minutes. Set aside to cool.
Lay a sheet of phyllo on a large cutting board and brush with the oil. Top with a second sheet and brush with the oil. Sprinkle half of the crushed cookies on top. Add another sheet of phyllo and brush with the oil. Cut the layered phyllo into 4 long strips. Put a small mound of the apple mixture about an inch from the bottom of one strip and fold the phyllo over the mixture into a triangle-shaped pocket. Continue to fold the strip up in the way to maintain the triangle shape so a turnover is formed. Repeat with the other three strips. Repeat the whole process again with the remaining three sheets of phyllo so that you wind up with 8 turnovers. Be sure to reserve a little oil to brush the top of each turnover.
Coat a baking sheet with cooking spray, place the turnovers on the sheet, brush the tops with the remaining oil, and bake until nicely browned, 20 to 25 minutes. Serve warm.
Serving Size: 1 Turnover
Calories: 200
Total Fat: 6.5 G
Protein: 2 G
Carb: 35 G
Fiber: 2 G
Chol.: 20 MG
Sodium: 82 MG
Monday, April 14, 2008
Tuesdays with Dorie - Marshmallows
I'll admit that I was a little terrified when Judy of Judy's Gross Eats chose marshmallows as this weeks Tuesdays With Dorie recipe. I've always read that you absolutely must have a stand mixer in order to make them and I just don't. (I've been promised one for Mother's Day though! woo!) But I decided to give them a try anyway.

Yeah, they aren't pretty. The whole hand mixer thing didn't work out for me. I'm not coordinated enough to pour hot liquid and run the mixer at the same time. So my meringue mixture deflated completely. I also wasn't very happy with how thin they were. In Dorie's book they were big and fluffy and amazing! Ehh. I guess if I had used a smaller pan it would've worked out better for me.
Part of the fun of making these marshmallows was that we could use Dorie's "Playing Around" section and make raspberry, cappuccino, or even pumpkin spice marshmallows. I wanted pumpkin spice but as I was standing in the grocery store looking at canned pumpkin I remembered a jar of chocolate maple peanut butter that my grandmother had brought back from Vermont. I've had it sitting in my fridge for months now not knowing what to do with it (besides eat it with a spoon of course) so I decided to try it out. It's not nearly as thick as regular peanut butter so I wasn't too worried about it weighing the marshmallows down.

Everything turned out okay. Unfortunately we aren't marshmallow people so Spencer and I each had two and they've been sitting on the counter ever since. But I'm glad to have learned something new and I plan on making marshmallows again when Christmas rolls around.
Marshmallows
Makes about 1 pound marshmallows
About 1 cup potato starch (found in the kosher foods section of supermarkets) or cornstarch
2 tablespoons light corn syrup
2 1/4-ounce packets unflavored gelatin
3 large egg whites, at room temperature
3/4 cup cold water
1 tablespoon pure vanilla extract
1 1/4 cups plus 1 tablespoon sugar
GETTING READY: Line a rimmed baking sheet -- choose one with a rim that is 1 inch high -- with parchment paper and dust the paper generously with potato starch or cornstarch. Have a candy thermometer at hand.
Put 1/3 cup of the water, 1 1/4 cups of the sugar and the corn syrup in a medium saucepan over medium heat. Bring the mixture to a boil, stirring until the sugar dissolves. Once the sugar is dissolved, continue to cook the syrup -- without stirring -- until it reaches 265 degrees F on the candy thermometer, about 10 minutes.
While the syrup is cooking, work on the gelatin and egg whites. In a microwave-safe bowl, sprinkle the gelatin over the remaining cold water (a scant 7 tablespoons) and let it sit for about 5 minutes, until it is spongy, then heat the gelatin in a microwave oven for 20 to 30 seconds to liquefy it. (Alternatively, you can dissolve the gelatin in a saucepan over low heat.)
Working in the clean, dry bowl of a stand mixer fitted with the whisk attachment or in another large bowl with a hand mixer, beat the egg whites on medium-high speed until firm but still glossy -- don't overbeat them and have them go dull.
As soon as the syrup reaches 265 degrees F, remove the pan from the heat and, with the mixer on medium speed, add the syrup, pouring it between the spinning beater(s) and the sides of the bowl. Add the gelatin and continue to beat for another 3 minutes, so that the syrup and the gelatin are fully incorporated. Beat in the vanilla.
Using a large rubber spatula, scrape the meringue mixture onto the baking sheet, laying it down close to a short end of the sheet. Then spread it into the corners and continue to spread it out, taking care to keep the height of the batter at 1 inch; you won't fill the pan. Lift the excess parchment paper up to meet the edge of the batter, then rest something against the paper so that it stays in place (I use custard cups).
Dust the top of the marshmallows with potato starch or cornstarch and let the marshmallows set in a cool, dry place. They'll need about 3 hours, but they can rest for 12 hours or more.
Once they are cool and set, cut the marshmallows with a pair of scissors or a long thin knife. Whatever you use, you'll have to rinse and dry it frequently. Have a big bowl with the remaining potato starch or cornstarch at hand and cut the marshmallows as you'd like -- into squares, rectangles or even strips (as they're cut in France). As each piece is cut, drop it into the bowl. When you've got 4 or 5 marshmallows in the bowl, reach in with your fingers and turn the marshmallows to coat them with starch, then, one by one, toss the marshmallows from one hand to the other to shake off the excess starch; transfer them to a serving bowl. Cut and coat the rest of the batch.
SERVING: Put the marshmallows out and let everyone nibble as they wish. Sometimes I fill a tall glass vase with the marshmallows and put it in the center of the table -- it never fails to make friends smile. You can also top hot chocolate or cold sundaes with the marshmallows.
STORING: Keep the marshmallows in a cool, dry place; don't cover them closely. Stored in this way, they will keep for about 1 week -- they might develop a little crust on the outside or they might get a little firmer on the inside, but they'll still be very good.
Playing Around
RASPBERRY MARSHMALLOWS: Fruit purees are excellent for flavoring these candies.
For raspberry marshmallows, you'll need a generous 1/3 cup of puree; reduce the vanilla extract to 1/4 teaspoon. After the batter is mixed, gently fold in the puree with a rubber spatula. You can use the same measurements and technique for other purees, such as strawberry, mango and passion fruit.
CAPPUCCINO MARSHMALLOWS: Sift 1/4 cup unsweetened cocoa powder, 2 tablespoons instant espresso powder and 1/2 teaspoon ground cinnamon together into a small bowl. Stir in 1/3 cup boiling water and mix until smooth. Reduce the vanilla extract to 1/2 teaspoon, and add it to the espresso mix. After you add the sugar syrup and gelatin to the meringue, beat in the espresso mixture and continue.
LIGHT CHOCOLATE MARSHMALLOWS: Melt 3 ounces bittersweet or semisweet chocolate and stir in 2 1/2 tablespoons unsweetened cocoa powder. Reduce the vanilla extract to 1/4 teaspoon, and after the marshmallow batter is mixed, fold in the chocolate mixture with a large rubber spatula.
PUMPKIN SPICE MARSHMALLOWS: Whisk together 1/2 cup canned unsweetened pumpkin puree, 1 teaspoon ground cinnamon, 1/2 teaspoon ground ginger, a pinch of freshly grated nutmeg and a pinch of ground allspice. After the marshmallow batter is mixed, fold in the spiced pumpkin with a large rubber spatula.
Friday, April 11, 2008
MIA.
I'm still around. I promise. Just got a lot going on around here.
I haven't been cooking many new things lately, mainly Spencer's favorites. I'm currently attempting to beat a really nasty eating disorder that I've had for the past 10 years so I've been subsisting on veggie burgers and apples. Hopefully soon I'll figure out the whole eating thing and get back into a cooking routine.
My face also had a run-in with the floor today:

Thanks to the aforementioned eating disorder I have crazy low blood pressure and even the tiniest adrenaline rush makes me pass out. I now have a black eye and the whole right side of my face is in pain.

I did put my waffle maker to use this past week. I made Banana-Cinnamon Waffles for me and Landon to snack on. They were really good and I love that they included whole wheat flour, buckwheat flour, and ground flaxseeds.
I hope everyone has a great weekend and I'll definitely be back on Tuesday for TWD. Marshmallows this week!
I haven't been cooking many new things lately, mainly Spencer's favorites. I'm currently attempting to beat a really nasty eating disorder that I've had for the past 10 years so I've been subsisting on veggie burgers and apples. Hopefully soon I'll figure out the whole eating thing and get back into a cooking routine.
My face also had a run-in with the floor today:
Thanks to the aforementioned eating disorder I have crazy low blood pressure and even the tiniest adrenaline rush makes me pass out. I now have a black eye and the whole right side of my face is in pain.
I did put my waffle maker to use this past week. I made Banana-Cinnamon Waffles for me and Landon to snack on. They were really good and I love that they included whole wheat flour, buckwheat flour, and ground flaxseeds.
I hope everyone has a great weekend and I'll definitely be back on Tuesday for TWD. Marshmallows this week!
Monday, April 7, 2008
Tuesdays with Dorie - Lemon Cream Tart
This week's Tuesdays with Dorie recipe was chosen by Mary of Starting from Scratch. Mary chose The Most Extraordinary French Lemon Cream Tart.

We were given the option of either doing this tart or Dorie's Fresh Orange Cream Tart. I had originally planned on doing the orange tart since I just made a lemon meringue pie for the Daring Bakers a few months ago, but after looking over the ingredients I decided I'd prefer the lemon.
It really wasn't a difficult recipe, but two of my tart shells fell apart anyway. As I was making the crust I knew it needed some moisture but I was too scared of screwing it up so I ignored my gut.
My lemon cream came together perfectly. It never got to Dorie's suggested temperature of 180 but it still thickened up beautifully and tasted great. And since two of my tart shells were ruined, I was able to make some strawberry cupcakes for the husband and use the lemon cream as a frosting. He seemed to enjoy that as much as the tarts themselves.
The Most Extraordinary French Lemon Cream Tart
For the crust
1 1/2 cups all purpose flour
1/2 cup confectioners sugar
1/4 teaspoon salt
1 stick + 1 tbsp unsalted butter, very cold, cut into pieces
1 egg yolk, lightly whisked
For the lemon cream
1 cup sugar
Grated zest of 3 lemons
4 eggs
3/4 cup lemon juice (4-5 lemons)
2 sticks + 5 tbsp (10.5 oz) unsalted butter, room temperature, cut into pieces
For the crust:
To make the crust, put the flour, icing sugar and salt in a food processor and pulse to combine. Add the butter and pulse until the mixture is coarse, around the size of oatmeal and/or peas. Add the egg yolk a little at a time, pulsing after each addition and then processing in 10-second pulses once the whole egg has been added until the dough forms clumps. Turn the dough onto a flat work surface and lightly knead the dough until all dry ingredients are just incorporated. Butter a 9 inch fluted removable-bottom tart pan. Press the dough into the pan evenly. Freeze for about an hour.
Preheat the oven to 375°F. Butter the shiny side of a piece of aluminum foil and fit it tightly against the crust. Bake for 25 minutes. Carefully remove the foil, and press the dough down gently if it has puffed using the back of a spoon. Return it to the oven for another 8 minutes, or until it is beautifully golden brown.
For the cream:
Before you start the lemon cream, have a candy thermometer, a strainer and a blender at hand.
Simmer a little water in a saucepan. Put the sugar and lemon zest in a large heatproof bowl. Off the heat, rub the mixture together with your fingers until the sugar is moist, grainy and aromatic. Whisk in the eggs and then the lemon juice. Set the bowl over the pan of water and whisk continuously until it reaches 180°F. As it gets close to temperature it will start to thicken. This can take up to 10 minutes, so be patient!
Remove the cream from the heat and strain it into the blender. Discard any solids. Let the cream stand at room temperature for about 10 minutes, or until it cools to 140°F. Turn the blender on high, and add the butter a few pieces at a time.
Scrape down the sides to incorporate the butter. Keep the machine on for 3-5 minutes once the butter is in to ensure a perfect lemon cream. Pour into an air-tight container and refrigerate for at least 4 hours (it will keep in the fridge for up to 4 days).
Assembly:
When you are ready to assemble the tart, whisk the cream to loosen it and spoon it into the tart shell.
Serve the tart or refrigerate as needed.
Subscribe to:
Posts (Atom)


